
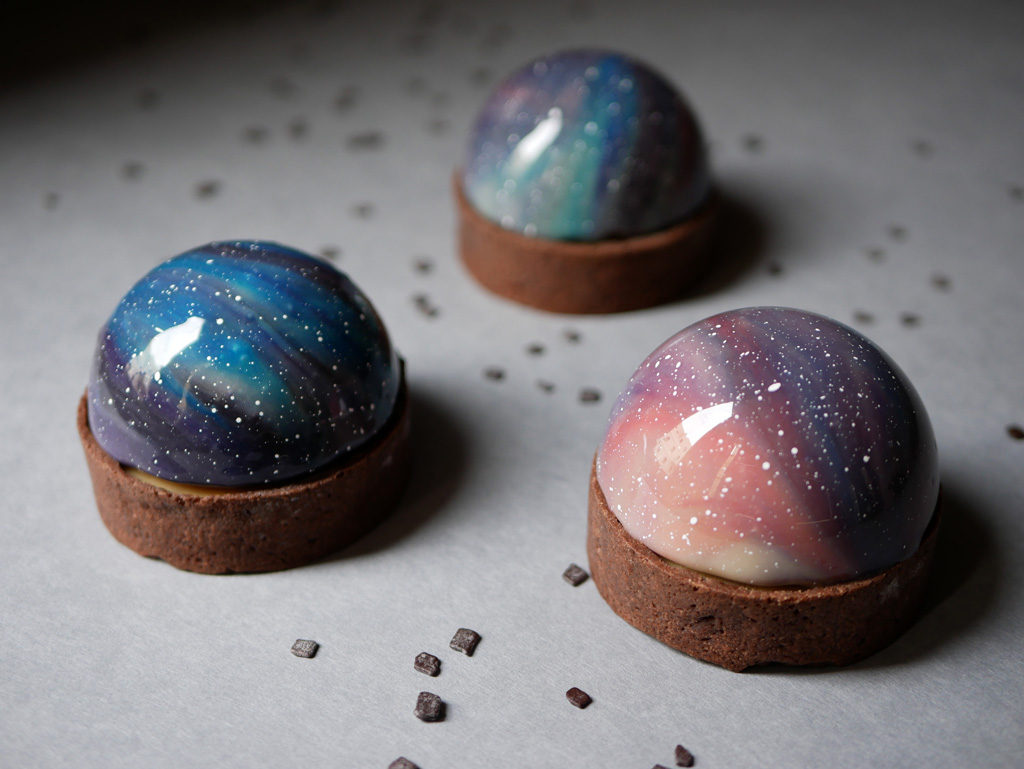
Milky Way Tartlets


Lately I’ve felt like I’ve opened a tartlet factory. I can’t stop making them and it’s very fun. Before I move on to other desserts, I decided to write one final tartlet post (for now) with a bang… a big bang! Many years ago, before I got involved in baking, I studied geophysics and planetary sciences at university. So I’ve wanted to create a galactic dessert for a while now. I decided to make a tartlet with a half sphere covered in a galaxy glaze. (and later on a solar version of them!)
A cut through the tartlet reveals a hazelnut planet surrounded by a chocolate ring. The base is filled with a caramel cream and the dome with “dulce” chocolate (caramelized white chocolate)* mousse and praliné.
Yeah, it resembles the American Milky Way chocolate bar a little (hence its name). Maybe more correctly, a Mars bar as it’s called in the rest of the galaxy. The chocolate bar has existed for almost 90 years now, and with such a cosmic name, there’s no doubt that it’s a suitable inspiration for this galaxy glazed tart.
* You may replace the caramelized white chocolate with white chocolate to shorten the process.


Ingredients
Gelatin mass
12 g gelatin powder
60 g water
Gianduja ganache core
40 g milk chocolate
20 g hazelnut praliné
50 g peeled hazelnuts
55 g heavy cream
Dulce-praliné chocolate mousse
60 g egg yolk
25 g eggs
45 g sugar
30 g water
25 g gelatin mass
105 g “dulce” chocolate
105 g hazelnut praliné
25 g dark chocolate 70%
3 g cocoa butter
200 g heavy cream
Cacao crust
175 g flour
25 g almond powder
75 g powdered sugar
15 g cocoa powder
2 g salt (½ tsp)
115 g cold butter (cut into cubes)
52 g eggs
Caramel cream
40 g water
20 g glucose
125 g sugar
255 g heavy cream
1 tsp vanilla paste
65 g egg yolk
20 g gelatin mass
Chocolate discs
150-200 g milk chocolate
Galaxy glaze
37 g water
75 g sugar
75 g glucose
50 g condensed milk
25 g gelatin mass
75 g white chocolate
Gel-based food coloring (black, metallic blue, purple & pink)
Stars decoration
White gel-based food coloring
Vodka
Equipment
Round cookie cutters, 6.5 cm & 3 cm diameter
6 round baking rings, 8 cm diameter and 2.5 cm height
A silicon mold of half-spheres, 3 cm diameter each
A silicon mold of half-spheres, 7 cm diameter each
Acetate sheet (or plastic wrap)
Offset spatulas (small & large)
Measuring pitcher
Thermometer
Paint brush
The recipe makes 6 galactic tartlets
Advance prep
Gelatin mass:
Sprinkle gelatin powder over the water, mix well and keep in the fridge for at least half an hour. Cut into small pieces before use.
Galaxy glaze:
it’s best to prepare the glaze 24 hours in advance for a better coating.
Break the chocolate into small pieces and put them in a measuring pitcher. Keep aside. Put glucose, condensed milk, water and sugar in a saucepan. Bring to a boil while mixing all along. Remove from heat and add gelatin mass. Mix until dissolved. Pour the mixture over chocolate, making sure all the chocolate is covered. Mix a little bit with a spatula and then use a hand blender to blend it to a uniform consistency. Strain the glaze through a sieve into a bowl (to get rid of air bubbles). Cover the surface of the glaze with plastic wrap. Keep in the fridge. When it’s time to use the glaze, warm the glaze to a temperature of 27-30 ºC (81-86 ºF) before transforming it into a galaxy glaze.
Gianduja ganache core
Grind hazelnuts to a paste in a small food processor. Transfer 20 g of the paste into a measuring pitcher and add hazelnut praliné and chocolate (cut into pieces).
Bring heavy cream to a boil. Pour immediately over chocolate, making sure all the chocolate is covered. Mix a little bit with a spatula and then use a hand blender to blend it to a uniform consistency.
Pour the ganache into 12 cavities in the small silicone mold and keep in the freezer.
Dulce-praliné chocolate mousse
Whip the heavy cream until you almost get soft peaks (beware not to over whip, the goal is to get a texture that resembles yogurt). Keep in the fridge.
Melt “dulce” chocolate, dark chocolate and cocoa butter on a double-boiler. Once the chocolate has melted, turn off the flame and add the hazelnut praliné. Mix well. If it becomes grainy form the chocolate, grind is with a hand blender to make it smoother. Leave the bowl on the double-boiler to keep the mixture warm.
Put egg yolk, eggs, sugar and water in a stainless steel bowl and whisk until uniform. Place the bowl on a second double-boiler and heat gently (low-medium fire) to 80-82 ° C (176-180 ° F), while mixing all along (you need some patience here).
Once the desired temperature is reached, strain the mixture immediately into the mixer bowl and whip on high speed for about 5 minutes, until the egg mixture cools. When you drop a spoonful of the mixture into the bowl it should fall back in ribbons and disappear into the mixture slowly.
…
In the meantime, melt the gelatin mass on a double boiler and remove the melted chocolate from the hot steam. Make sure the chocolate temperature is between 45-50 ° C (113-122 ° F). If needed, transfer the chocolate into another bowl to cool it faster.
Add the melted gelatin mass to the egg mixture and mix a little. Add the warm chocolate and mix until uniform. The texture will become viscous. Remove the heavy cream from the fridge and whip it a little more (remember, yogurt texture).
Fold the heavy cream into the egg mixture in three parts. Place the silicone mold with the large cavities on a tray. Pour the mousse immediately into 6 cavities almost to the end. Give it a little shake to flatten the mousse.
Remove the Gianduja ganachecores from the freezer and release 6 of them from the mold. Place one core in the center of each mousse dome. Keep the domes in the freezer for at least a few hours until it’s easy to release them from the mold.
Cocoa crust
Put flour, almond flour, powdered sugar, cocoa powder salt and butter cubes in the mixer bowl and keep in the fridge for about 10 minutes. Remove from fridge. Using the paddle attachment, start mixing at low-medium speed until the batter reaches sand-like consistency. Make sure the butter chunks are as small as possible at the end of the process without melting the butter.
Add the eggs all at once and keep mixing at medium speed until the dough starts to form but is not yet completely uniform. Remove dough parts from the bowl and combine. Cover dough with plastic wrap. Roll out the dough a little bit, giving it a rectangular shape. Keep in the fridge for at least an hour. (It’s always better to prepare the dough in advance. The dough keeps for up to a week in the fridge and for about two-three months in the freezer.)
When the dough is stiff and cold, remove the plastic wrap and divide the dough into 6 equal-sized pieces. Leave one piece of dough on the counter top and put the rest back in the fridge. In a cool room, flour the work surface, place the dough on top and dust it with flour as well. Roll out the dough with a rolling pin. Keep turning the dough throughout and make sure it doesn’t stick to the surface. Roll out the dough to a 3-4 mm thickness.
Please note (!) If at any point the dough starts to soften, put it back in the fridge until it is stiff again.
Fonçage
Lightly butter the inner side of the baking rings so that the dough sticks to it. Place the ring gently on top of the dough and cut a larger circle around the ring. Place the ring on a parchment paper and place the dough gently on top of it.
Lift the edges of the dough, gently push the rest of the dough down and attach the edges to the sides of the ring, starting from the bottom of the ring to the top. Gently press down on the sides so that the corners at the bottom form a right angle. (It’s not the end of the world if the dough gets torn accidentally. Just attach the sides that have been torn apart and move on). Go over the top of the ring with a sharp knife and remove the excess dough. Put the tartlet crust in the freezer and repeat the process with the rest.
Blind baking
Prick the bottom of each crust all over with a fork and put back in the freezer until the dough is stiff again (about half an hour). Line each crust with a piece of parchment paper. Fill the crust with pie weights or dry chickpeas. Keep in the freezer. Preheat the oven to 170 ºC (340 ºF).
When the desired temperature is reached, remove the crusts from the freezer and set them on a baking sheet lined with parchment paper. Place the sheet in the oven and bake for 10 minutes. Remove the baking sheet from the oven and gently remove the parchment paper containing the pie weights (be careful not to break the crust in the process). Put the crust back in the oven and bake for about 8 more minutes until the crust is set and dry. Keep aside to cool.
Brush the top of each crust against a flat mesh sieve to straighten the edges and give it a cleaner, sharper look.
Caramel cream
Put egg yolk in a large bowl and keep aside.
Put glucose in a saucepan. To avoid a sticky situation, first, wet the tips of your fingers with water, then grab some of the glucose and transfer it to the saucepan (which should be set on a scale to know how much glucose you’re putting in).
Add water and sugar to the saucepan and put on medium heat. Do not mix with a spatula while heating, just tilt the pot occasionally to mix it a little.
Simultaneously, put heavy cream and vanilla in a small pot and bring to a boil. Keep aside. Go back to the saucepan and keep heating it until the bubbling syrup changes its color to amber brown. Lower the flame and gradually add the warm heavy cream, while whisking all along (be careful from the hot steam).
Bring the mixture to a boil. Gradually pour the boiling mixture to the egg yolk bowl while mixing with a spatula all along. Check if the temperature reads 78 ºC (172 ºF). If it’s lower, reheat the mixture on low heat, while mixing all along, until the desired temperature is reached. Be careful not to pass 84 ºC (183 ºF).
Remove from heat. Add gelatin and mix well. Strain the mixture into a measuring pitcher and blend it with a hand blender. Pour the mixture into each crust almost to the end. Let it cool a little before the next step.
Remove the rest of the Gianduja ganachecores from the freezer and release them from the mold. Place one core in the center of each crust. Keep in the fridge/freezer to let the cream set.
Chocolate discs
Take a flat baking sheet and wipe its surface with a damp towel. Place an acetate sheet (or plastic wrap) on the damp surface (moisture allows it to stick to the surface). Go over the top of the sheet with a dry paper towel to remove air bubbles and to straighten it.
Temper chocolate following this post. Once the chocolate is tempered, pour it to the center of the sheet. Using a large offset spatula spread the chocolate across the sheet (up a bit, down a bit, and then sideways) to get a thin and uniform layer. Avoid moving the spatula over the chocolate more than once or twice.
Give the chocolate a minute or two to set, just until it’s almost dry to the touch. Using the 6.5 cm cookie cutter, cut 6 circles. Then, using the 3 cm cookie cutter, cut 6 smaller circles in the center of each big circle.
Putting it all together!
Remove the crusts from the fridge/freezer. Place a chocolate disc on each one. Warm the glaze to a temperature of 27-30 ºC (81-86 ºF). You should work fast at this stage, or try to keep the glaze in that range of temperature.
Pour the glaze into a small bowl (about 10 cm wide, 7 cm high). Dip a different toothpick in each food coloring. Paint the glaze in a circular motion on four corners of the bowl without mixing the colors (see picture above). Take a clean toothpick and make a spiral between all the colors to transform it into a galaxy glaze (be careful not to over mix).
Insert a toothpick in each mousse dome. Release one dome from the mold and keep the rest in the freezer. Dip the dome in the galaxy glaze up to its edge (don’t cover the bottom). Flip the dome, set it on a raised cooling rack and remove the toothpick from the bottom (preferably with the help of a friend). Repeat the process with the rest the mousse domes.
Mix a few drops of white food coloring with a few drops of vodka to dilute the food coloring. Dip a paint brush in the color and spray it on the mousse domes, creating a starry effect on the galaxy effect.
Slide a small offset spatula under the mousse and move the mousse around on the cooling rack to get rid of the excess galaxy glaze on the bottom.
Lift the mousse with the spatula and place it on top of the crust. Keep the Milky Way tartlets in the fridge in an airtight container for up to two days.


1 Comment
Leave a reply:

![]()
Get updates by email
![]()


… [Trackback]
[…] Read More: cake-lab.org/pastries/milky-way-tartlets/ […]