Rainbow Cake


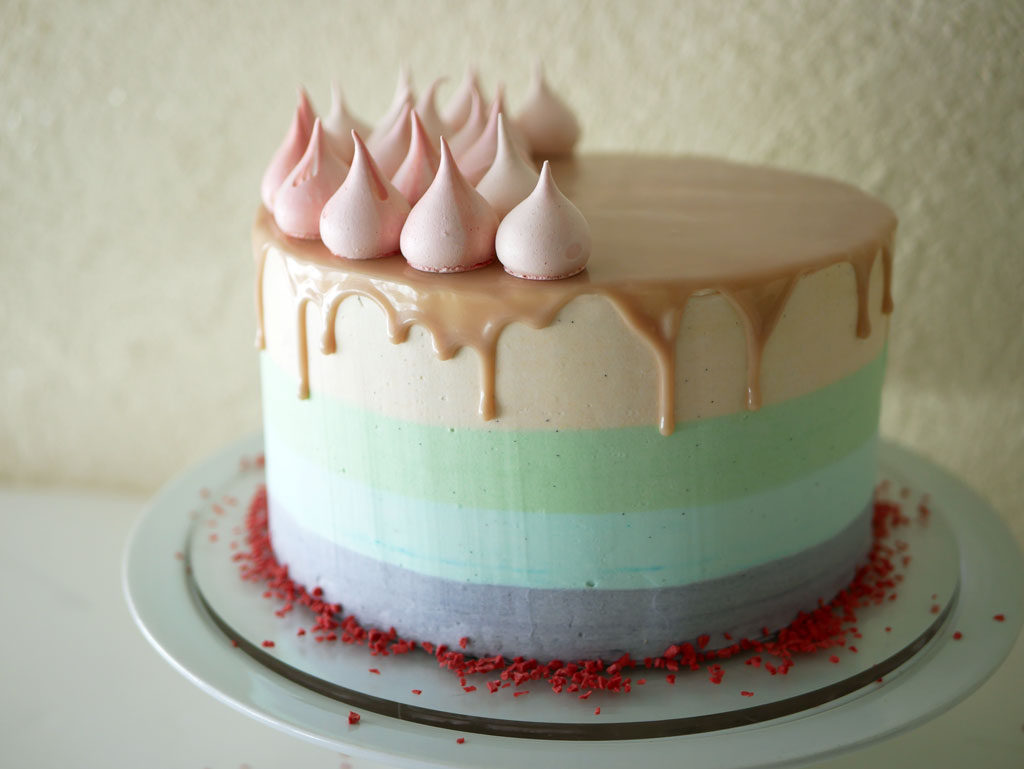
Emily celebrated her second birthday last month. She was visiting from the US with her parents, and her mom, Karen, asked me to make her a colorful birthday cake (= rainbow cake!). I met Karen about 15 years ago, when I was a kid myself. Well, not really a kid, but a college student straight out of high school. Her request made me nostalgic and led me to make a birthday cake for a cute little girl I hadn’t met yet. How did I know she’s cute? Karen sent me a picture of Emily with her whole face buried inside the cake. A girl after my own heart.
I took it as an opportunity to fix all the problems I had with the last rainbow cake I made for my niece. I created the colors around the cake from Swiss meringue buttercream in which I replaced half of the butter with white chocolate. Only after the fact I realized that white chocolate is the devil. It affects the taste and the texture, and not in a good way. This time I replaced half the butter with mascarpone cheese. So what if it’s more expensive, kids deserve a little quality too.
…
I also had a chance to work on the glaze. I almost threw the last rainbow cake in the trash just because of the horrible glaze. The white glaze dripped too far and the pink glaze hardly even dripped. My family really loved the rainbow cake, but it just hurt my eyes. After a few attempts (you can see them in the picture below), I discovered the perfect glaze by combining both chocolates together (ruby and white).
From one chocolate cake to the other, I try my luck and change an ingredient or two. For this rainbow cake I decided to reduce the amount of sugar. Not by much, but it’s a good start. I believe I could even reduce it by as much as half of the original amount. I will try it next time.




Ingredients
Chocolate ganache
400 g dark chocolate
400 g heavy cream
Chocolate cake
420 g flour
120 g cocoa powder
3 tsp baking powder
2 tsp baking soda
500 g sugar
1½ tsp salt
3 eggs (160 g)
150 g canola oil
1½ tsp vanilla extract
335 g milk
300 g boiling water
1½ tsp instant coffee (in granules or powder)
Swiss meringue buttercream
3 egg whites (105 g)
¾ cup sugar (180 g)
170 g soft butter at room temperature
170 g mascarpone at room temperature
¾ vanilla paste
Gel based food coloring (purple, blue, green, orange/yellow)
Chocolate glaze
35 g ruby chocolate
70 g white chocolate
70 g heavy cream
Meringue kisses
150 g sugar
75 g egg whites at room temperature
1 tsp vanilla paste
Gel based food coloring (red & orange)
Equipment
Thermometer
A round baking pan, 20 cm wide and 10 cm high
Pastry bags
A basketweave piping tip, 12 mm wide (preferably 25 mm)
A 16 mm smooth piping tip
A wide cake scraper
A small offset spatula
The recipe makes 1 rainbow cake, 20 cm wide and 10 cm tall
Chocolate ganache
Break the chocolate into small pieces and put them in a measuring pitcher. Bring heavy cream to a boil. Pour immediately over chocolate, making sure all the chocolate is covered. Mix a little bit with a spatula and then use a hand blender to blend it to a uniform consistency.
Transfer into a bowl and cover the surface with plastic wrap. Let the ganache cool at room temperature for a few good hours (or even overnight) until it gets to a creamy texture that is easy to spread.
Chocolate cake
Lightly grease the baking pan with oil. Line the pan with parchment paper by cutting a circle, 20 cm in diameter for the bottom, and a rectangle to fit the sides of the pan.
Sift flour, cocoa powder, baking powder and baking soda into a bowl. Add sugar and salt. Mix until uniform. Set aside.
Preheat oven to 175º C (350º F). Whip the eggs on medium speed until you get a foamy texture. Add canola oil and vanilla extract and mix until uniform. Bring water to a boil.
Add a third of the powder mixture to the egg batter and mix until uniform. Please note (!) Once the flour is combined in the batter, do not over mix. Add half of the milk and mix again. Add another third of the powders and mix. Add the rest of the milk and mix. Finally, add the rest of the powders and mix until the batter is uniform.
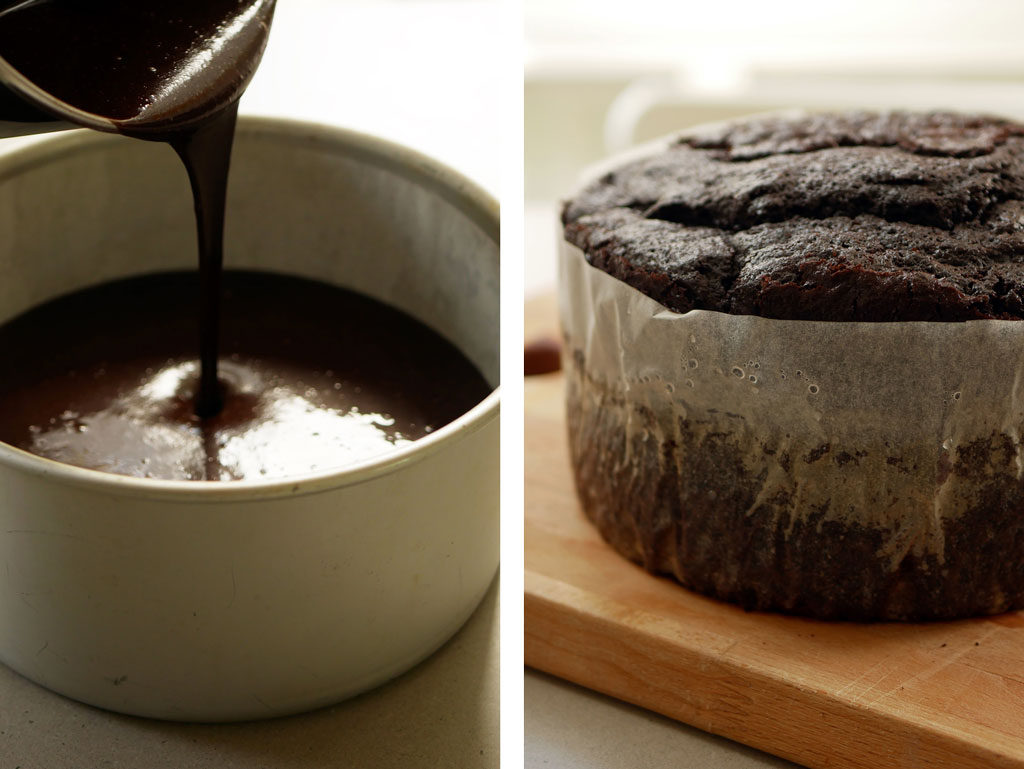
Add instant coffee to the boiling water. Mix well and add carefully to the batter. Mix again until uniform. Pour the batter into the baking pan. If possible, wrap a strip of a damp towel around the baking pan to get a more uniform bake.
Bake
Put the baking pan in an oven preheated to 175º C (350º F) and bake for 60-65 minutes. Stick a toothpick in a crack in the center of the cake to check if it’s ready. The toothpick should come out almost dry, with just a bit of crumbs.
Remove the pan from the oven and keep the cake at room temperature for about 10 minutes before releasing from the pan. Let the cake cool completely at room temperature and then keep in the fridge until ready to cut. (The cakes can be kept in the fridge for about a week or in the freezer for about a month)
Assembling the cake
Cut the cake into 3 layers, each layer 3 cm high, with a large serrated knife or a saw. To get a straight clean cut, keep turning the cake and cut first from the sides then slowly advance to the center of the cake.
Spread a little bit of ganache in the center of a serving plate (flat with no corners). Assemble the cake upside down: Turn over the top layer and place it on the plate. Spread a layer of ganache over the cake (about 1 cm thick). Flatten the surface with a spatula.
Place the second cake layer over the first one. Spread another generous layer of ganache on top. Place the third cake layer over the second one. Remove the parchment paper from the top of the cake (which not long ago was actually its bottom).
Spread ganache generously around the sides of the cake. Use a cake scraper to remove all the excess ganache. To do so, press the scraper on the side of the cake while turning the cake around, leaving it with a smooth layer of ganache around the cake. (If there are dents, fill them with ganache and smooth them again with the scraper). Smooth the top edges as much as possible. Keep in the fridge for an hour or two until the ganache has set.
Swiss meringue buttercream
Put egg whites and sugar in a steel bowl. Set on a double boiler and heat on medium heat while whisking all along. When the mixture’s temperature reaches 70 ºC (160 ºF), lower the heat and continue whisking for a one more minute. This way the eggs get pasteurized. Remove from heat and allow it to cool at room temperature.
In the meantime, put butter in a bowl and whip (using a hand mixer or a stand mixer) for about half a minute. Add mascarpone gradually and continue to whip until the texture is smooth and fluffy, about 5 minutes. If some liquid forms in the bowl when adding the mascarpone, just get rid of it and continue to whip. (This could be avoided if the ingredients have the same temperature).
When the temperature of the egg white mixture reaches 40 ºC (105 ºF), strain it directly into the bowl of the butter and mascarpone. Whip everything together until you get a smooth and silky cream. Scrapes the sides of the bowl occasionally. Add vanilla paste and whip it a little bit more.
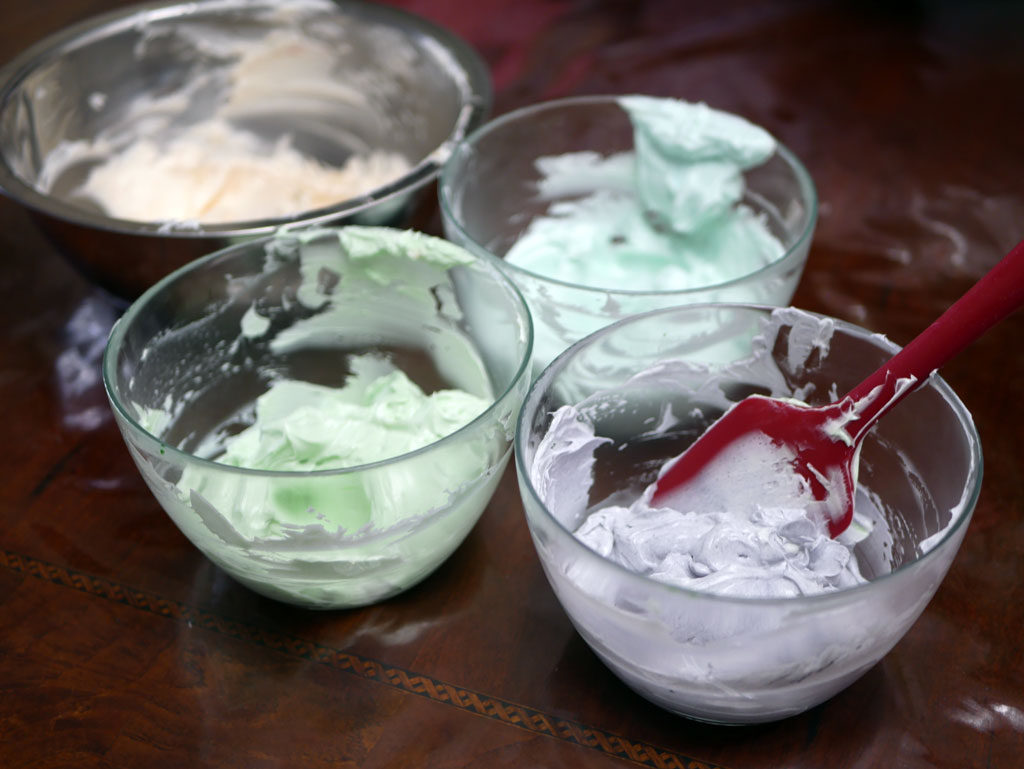
Divide the buttercream into 4 separate bowls equally. Using a toothpick, color each batch with a bit of food coloring and mix until uniform. Fit a pastry bag with a basketweave piping tip, 12 mm wide (25 mm is better, but I only had 12 mm). Fill the pastry bag with the purple buttercream.
…
Remove the cake from the fridge. Pipe 2 purple stripes around the cake at the bottom. (If you use a wider tip, such as 25 mm, one stripe will be enough). You have to pipe the buttercream close to the cake (otherwise some of the stripes might just fall off the cake while smoothing the sides with the spatula).
Remove the piping tip, clean it and fit it to a new piping bag. Fill the pastry bag with the blue buttercream. Pipe 2 additional stripes around the cake and above the purple stripes.
Remove the piping tip, clean it and fit it to a new piping bag. Fill the pastry bag with the green buttercream. Pipe 2 additional stripes around the cake and above the blue stripes.
Remove the piping tip, clean it and fit it to a new piping bag. Fill the pastry bag with the orange/yellow buttercream. Pipe 2 or 3 additional stripes around the cake and above the green stripes. Spread a bit of buttercream on top of the cake and smooth it using a spatula.
Press the scraper on the side of the cake while turning the cake around, leaving it with a smooth layer of buttercream around the cake. It’s best not to repeat the process too many times. For now, ignore the spikes that appear around the top of the cake and keep it in the fridge.
After cooling the cake in the fridge, the buttercream will set and harden. Using an offset spatula, go over the top and “cut” the spikes until you get a clean and straight edge. Keep the cake in the fridge for a few hours or even overnight.
Chocolate glaze
Break both chocolates into small pieces and put them in a bowl. Bring the heavy cream to a boil and pour over chocolate, making sure all the chocolate is covered. Let it sit for one minute and mix it with a spatula until uniform. If the chocolate is not fully melted, warm the mixture slightly on a double boiler just until all the chocolate has melted and the texture is smooth.
Let the glaze cool at room temperature for about half an hour until the texture is viscous (and the temperature is down to 27 °C (81 °F). Remove the cake from the fridge. Pour most of the glaze on top of the cake right in the center. Straighten the surface with an offset spatula.
To create the “drip effect”, push the glaze very gently over the edge and let it drip down the sides. Put the cake in the fridge immediately to let the glaze set (about half an hour to an hour).
Meringue kisses
I used the Meringue Girls recipe to make the meringue kisses. It’s one of my favorite recipes. It’s a pretty quick one too. The kisses come out a bit soft on the inside and that exactly how I like them. The only minus is that they tend to crack a little during baking.
Preheat oven to 200 °C (390 °F). Grind the sugar in a food processor. Line a baking tray with parchment paper. Spread the sugar on top in an even layer. Put the tray in the oven and bake for about 5 minutes until the edges of the sugar start to caramelize a little.
In the meantime, whip the eggs whites on medium speed until thick white foam is formed. Increase the speed to high and whip until stable. Remove the sugar from the oven. Add it to the egg whites slowly and gradually.
Once all sugar has been added, increase the speed to high and whip until firm peaks (about 7 minutes). Towards to the end, add vanilla and keep whipping.
…
In the meantime, preheat oven to 100 °C (210 °F). Fit a pastry bag with a smooth 16 mm tip and fill it with the meringue. Line a baking sheet with parchment paper. Glue the baking paper unto the sheet with a little meringue on the corners.
Pipe small dollops of meringue on the baking sheet. Place in the oven and bake between 30 to 40 minutes until the meringue kisses are easily removed from the parchment paper. Remove from oven and let them cool at room temperature. The kisses keep for two weeks in an airtight container.
Decorate the top of the rainbow cake with meringue kisses. Since the kisses might soak the humidity from the fridge, it’s best to add them to the cake just before serving. Keep this rainbow cake in the fridge in an airtight container (or on a separate shelf) in the fridge up to a week.
Tags In
Related Posts
Leave a reply:Cancel reply

Search the blog
![]()
Get updates by email
