
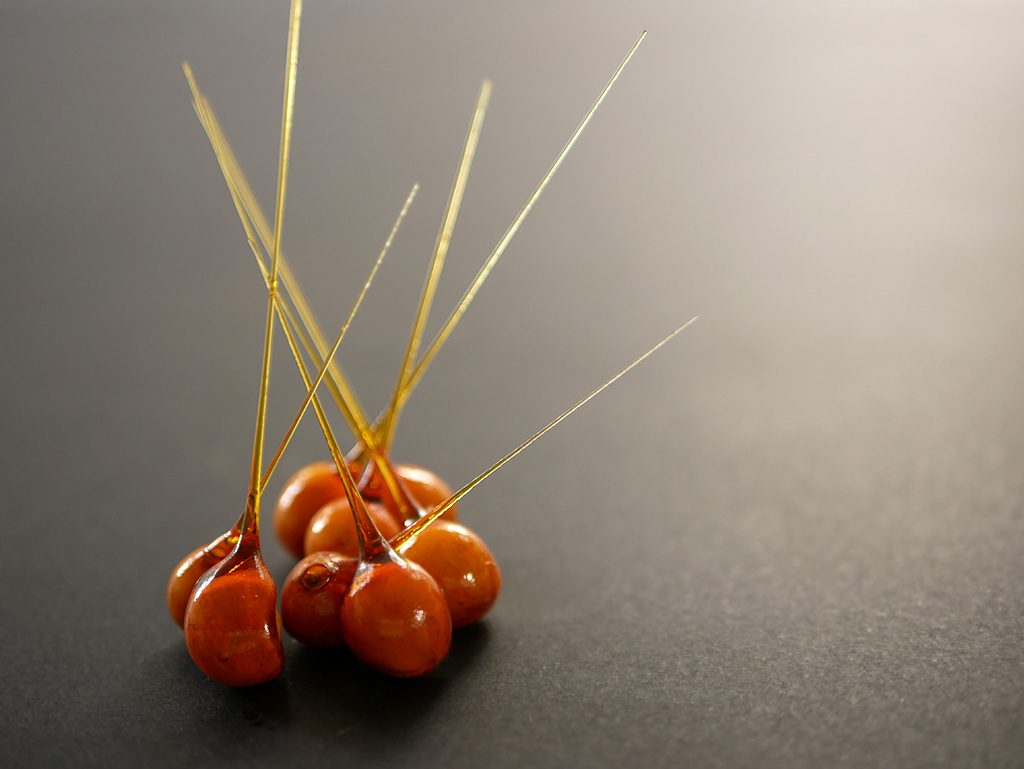
Caramelized Hazelnuts


I always wanted to make caramelized hazelnuts for fancy decoration on desserts, but I always feared that long sugary tail. This time I told myself, no more! I stepped into the kitchen, cooked sugar into caramel and dipped whole hazelnuts into it. Lo and behold, it worked. It wasn’t even that complicated. I even managed to do it on a rainy, gloomy day. I felt like Martha Stewart, who actually demonstrates the task elegantly alongside Fran Drescher from “The Nanny” (What nostalgia, her voice suddenly sounds like music to my ears).
It’s beautiful decoration, but doesn’t survive long. Not because it’s so tasty and tempting to gobble before decorating. The caramel coating absorbs moisture from the air and so the tail might break or disappear. That’s why it’s crucial to work in a dry room, far from moisture. Rainy or very humid days are not ideal for the task. Nevertheless, despite the rain, I went ahead and tried it out. To dry the air, I turned the AC on heat mode, on a pleasant temperature (23 ºC / 73 ºF). I also made sure the airflow didn’t blow directly on the caramel.
I must admit, it doesn’t hurt that I live in Jerusalem. “Every baker’s dream”, as a chef at my pastry school once said. The air here is so dry that it’s a delight to work in the kitchen, especially on desserts sensitive to humidity. Tel-Aviv, don’t be jealous. You’ve got a beach.


Ingredients
Caramelized hazelnuts
200 g sugar
60 g water
About 10 hazelnuts
Equipment
Toothpicks
A heavy cutting board
Clean saucepan
Peel the hazelnuts following the steps in this post. Lately I just prefer to do it using the quick method: roasting and rubbing. Roast a large amount of hazelnuts in an oven preheated to 180°C (360ºF) for about 15-20 minutes. Remove from the oven and carefully transfer them onto a towel. Cover and rub them thoroughly until most of them are naked. Let the peeled hazelnuts cool at room temperature and then weigh the amount needed.
Advanced prep:
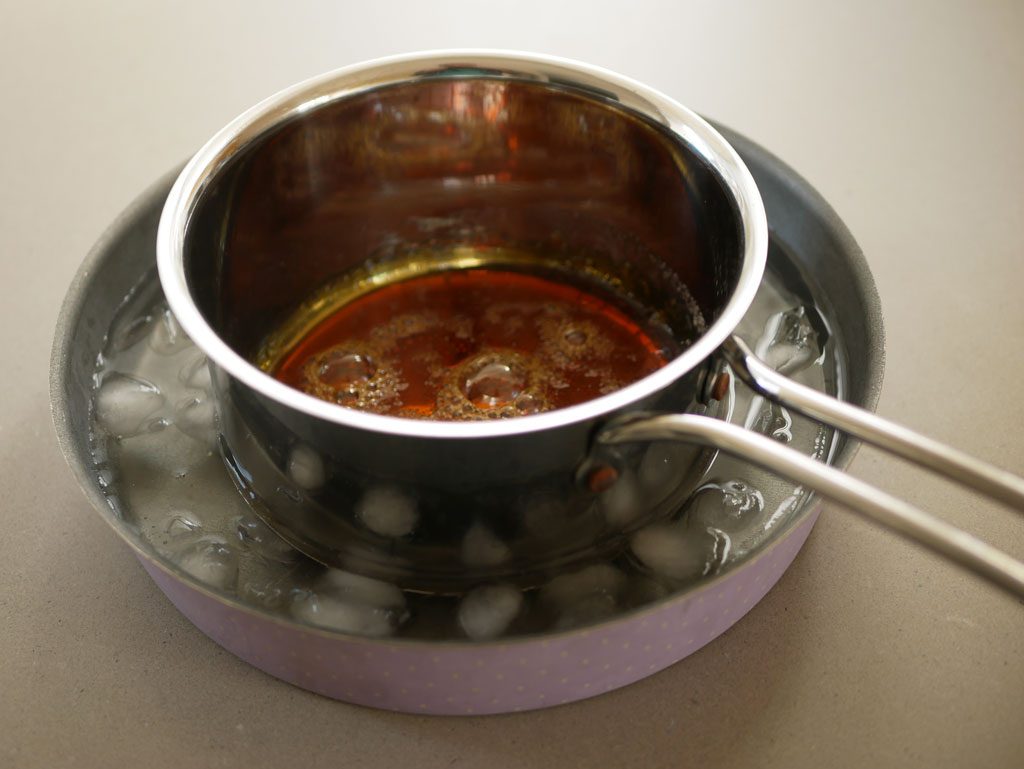
* Prepare an ice bath – Put cold water and ice cubes in a wide pan.
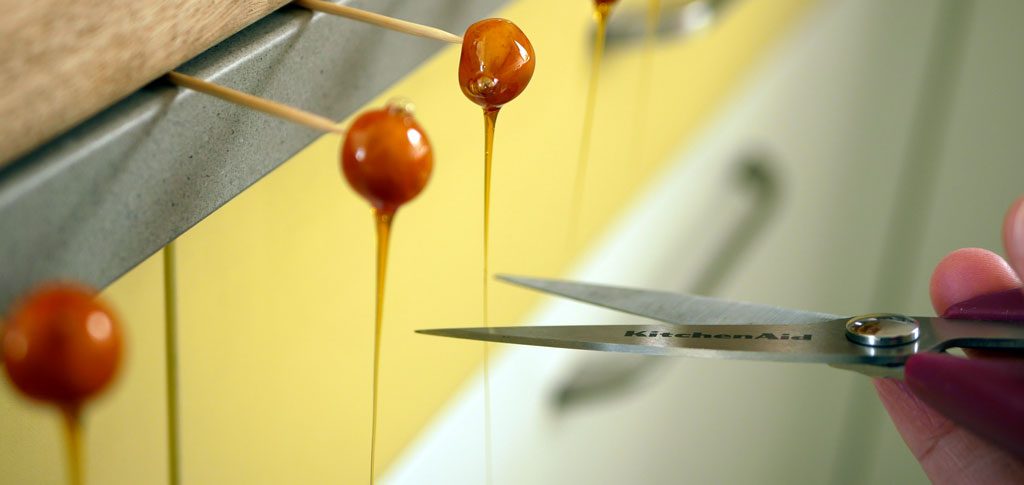
– Align a heavy cutting board right on the edge of the working surface.
* Line a tray with baking paper and place it on the floor right under the cutting board to collect all the excess caramel from the nuts.
– Gently, insert a toothpick in every hazelnut.
Caramel:
Put water and then sugar in a saucepan. Place on medium heat. Stir the sugar with a spatula to dissolve it. Once the water starts to boil, stop stirring and remove the spatula. Keep on medium heat until you get an ember – light brown color. (You may slightly tilt the saucepan now and then to get a more uniform heating).
Important (!) The more you cook the caramel, the darker the color will be. The caramel might become bitter.
Once you reach the desired color, remove the saucepan from heat. Immediately dip it in the ice bath for just a moment to stop it from cooking more. Remove the saucepan from the ice bath and set it on a kitchen towel. Wait a minute or two until the caramel starts to thicken. Using the toothpick, dip a hazelnut in the suacepan and cover most of it with caramel. Place the toothpick on the edge of the work surface under the cutting board so that the excess caramel will drip from the hazelnut onto the tray that was placed on the floor underneath it.
Repeat the process for the rest of the hazelnuts. Place them one next to the other under the cutting board, but not too close – the caramel strands dripping from the hazelnuts might cling to one another. Once the caramel has set, use scissors to cut the strands to the desired length.
…
The caramel in the saucepan might harden after a short time. Don’t worry about it. Place the saucepan back on medium heat and melt the caramel again. After removing from heat, dip the saucepan shortly in the ice bath once more. Continue caramelizing the hazelnuts.
Once the caramel has set around the hazelnuts, gently release the toothpick from each hazelnut. Place the caramelized hazelnuts directly on the dessert and serve. Or, keep it exposed to air for a few hours only, in a dry place far from humidity, caramel’s archenemy.


4 Comments
Leave a reply:

![]()
Get updates by email
![]()


Hi! Thanks for the write up. Have a relative that’s allergic to most nuts, but I like the effect of these for a cake I’m making. Do you think it would be possible to do this with a cranberry? Or do you think the caramel will be hot enough after thickening that the berry will shrivel/cook?
Hi Jennie,
you are right. Unfortunately, I do fear that the cranberry will indeed be cooked and shrivel from the heat of the caramel. However, now that I think about it, maybe if the cranberries are very cold, it wouldn’t get to that. But that means the caramel in the saucepan could get colder faster and won’t be easy to work with. So yeah, fruit complicate this a bit :/
how do I carry these nuts over to a different venue – like for e.g. an engagement party?
And How long in advance can they be made?
Thanx sooooo much!!!
debbie
Hi Debbie,
I would actually be a little scared making these for a venue. They’re finicky and not so reliable. Any tiny changes in the weather may affect them greatly. When I made these, I remember they stood nicely for the day, but at the end of the day the tip started to melt from the humidity in the air.