Island Cake

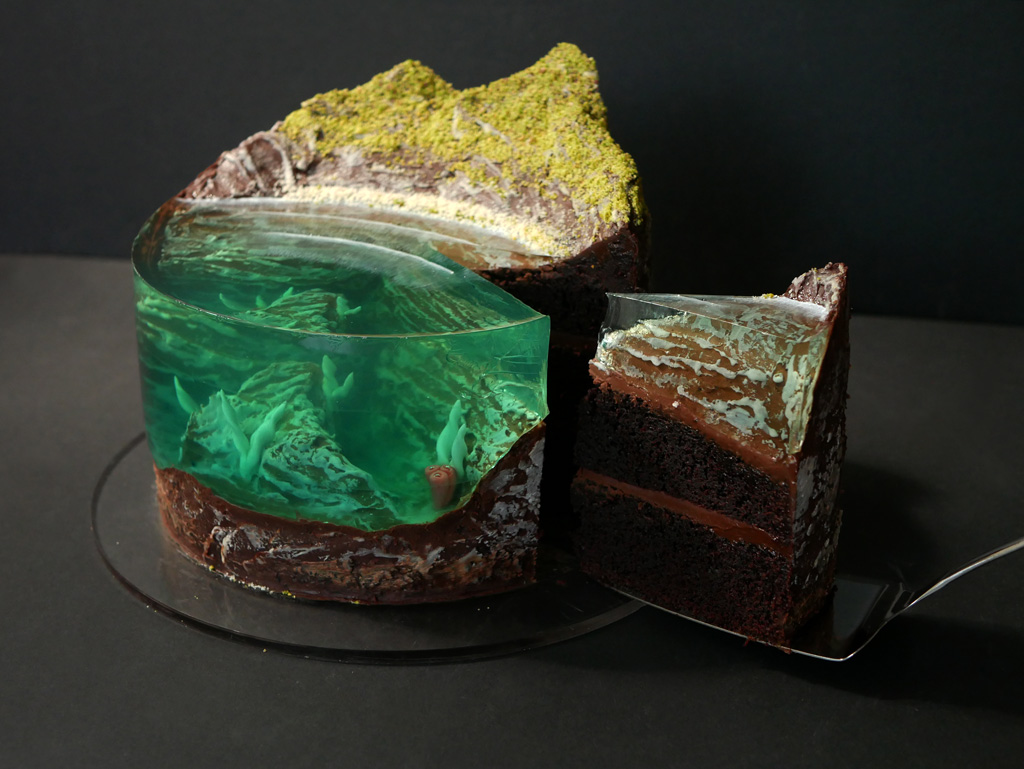
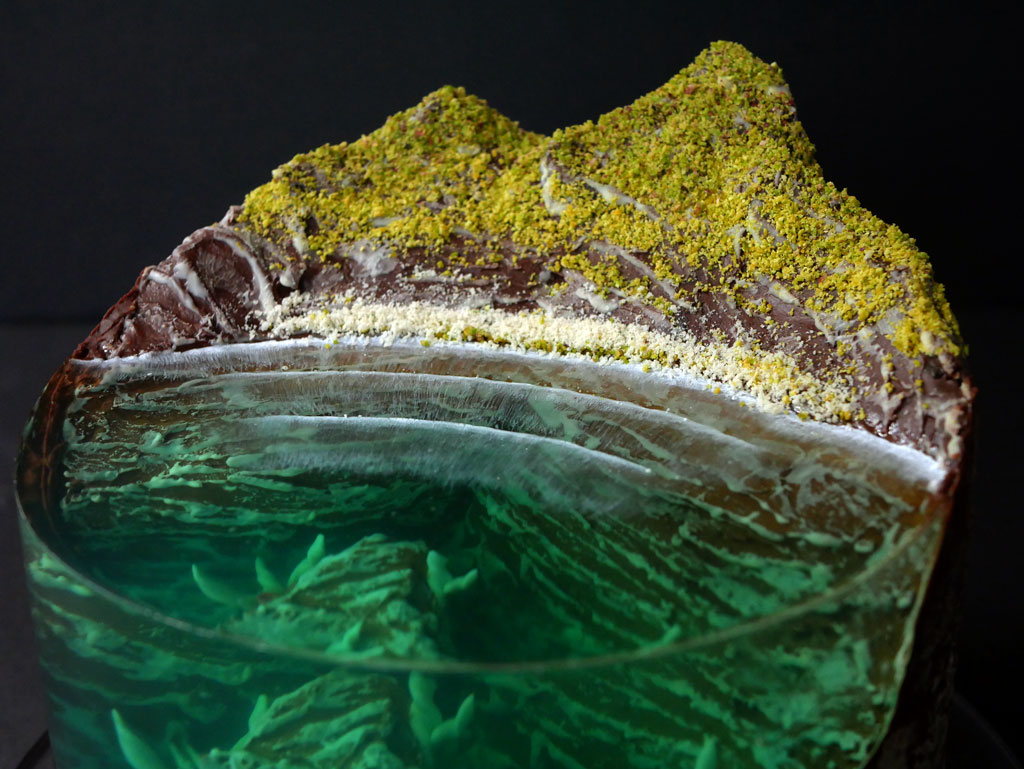
If there’s one good thing to come out of this horrible year, it’s these cakes. The loneliness (more like the isolation) and the inability to travel and relax this summer gave birth to a dream destination cake: a tropical island in the middle of an ocean. I too gave in to this year’s trend. I recommend setting aside three days to make this island cake. Don’t worry, it’s not intense, except for the second day. At least it’s something to do in our new lockdown here.
I made my dad a Turkey-themed island cake for his birthday last week. Before the pandemic, he’d fly to Turkey about every month or two. It became a kind of second home for him. Truth be told, the last time he came back was the same evening the first lockdown began earlier this year. He landed an hour after the deadline for anyone returning from abroad to go into isolation. Just his luck.
This summer,
the internet exploded with ocean or island cakes, every one of them spectacular. I watched a ton of YouTube videos, but there was one island cake I liked most of all, by chef Hugo Fernandez. Besides his cool lighthouse, I loved that his ocean is built into the cake and doesn’t wrap around the whole cake, which reduces the risk of liquid Jell-O escaping the cake and causing a catastrophe in the fridge.
So I followed his instructions and made my own. I don’t know Spanish, but Google Translate kindly provided reasonable English subtitles. I was fascinated by the whole process until I burst out laughing at the end. When Hugo finished his cake, both his hands enter the frame and clap for the cake. But seriously now, well done sir. It deserves all the applause in the world. Both your island cake and your red bowtie.
So How do you eat something like that? If you like Jell-O, you’ll have no problem. When I was growing up my mother would make glasses of red and yellow Jell-O with strawberries and grapes inside. It was so good. For this cake I made the Jell-O with grape flavoring.
Speaking of Jell-O, most of the island cakes online call for enormous amounts of gelatin in the Jell-O. You can see how stable their Jell-O is when they cut or rotate the cake.
Hugo, and I of course, made a softer Jell-O that is a bit reminiscent of the Jell-O of my childhood. It jiggles. If you come upon an island cake with an ocean as stable as the cake itself and resembling silicone implants, stay away. You can also just remove the Jell-O from your piece of cake and enjoy a delicious chocolate cake with layers of rich chocolate ganache.
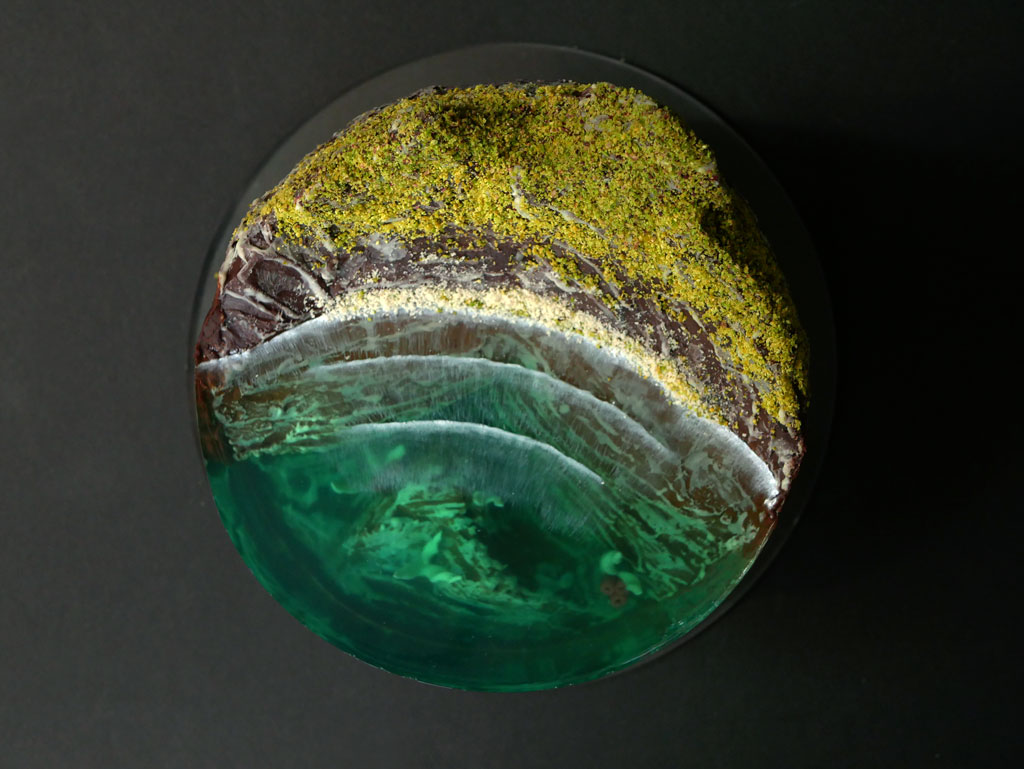
Some notes on a deserted island
* Usually, crushed biscuits are used for the tropical island effect. The crushed biscuits are divided in two portions and each portion is then colored in a different shade of green. Well, my Sicilian pistachios are very green, so I grounded roasted pistachios and raw pistachios and got two different shades of green.
* Uncolored crushed biscuits are usually used for the sandy beach. I replaced that with blanched almond powder and it worked out great.
* You can color the ocean in a gradient of teal. To do that, you have to divide the liquid Jell-O into three portions (about 400 g each portion) before coloring. Color one portion in teal, the second portion in a lighter color of teal and leave the third portion clear. When it’s time to pour the Jell-O, pour the darker color first. Keep in the fridge until almost set but still liquid, about 5 minutes (be careful, if the Jell-O is fully set, you’ll get a dividing line between each later). Repeat the process with the lighter color and then the clear color.
* You can decorate the bottom of the ocean with whatever you can think of. I didn’t try, but I read that fondant might expand in the Jell-O and its color my seep out. So I used modeling chocolate (I had leftovers from the little mermaid cake). I created corals and seaweeds and attached them to the bottom.
Ingredients
Chocolate ganache
400 g dark chocolate
400 g heavy cream
Chocolate cake
420 g flour
120 g cocoa powder
3 tsp baking powder
2 tsp baking soda
580 g sugar
1½ tsp salt
3 large eggs
150 g canola oil
1½ tsp vanilla extract
335 g milk
300 g boiling water
1½ tsp instant coffee (in granules or powder)
Gelatin mass
40 g gelatin powder
250 ml lukewarm water (1cup)
Jell-O
750 ml boiling water (3 cups)
300 g sugar
1.5 tsp citric acid
Gelatin mass
1 tbsp grape extract (or any other flavor)
Teal food coloring (or blue)
Decoration
50 g white chocolate
White food coloring
Shelled pistachios
Blanched almond powder
Red & Green modeling chocolate (optional)
Equipment
A round baking pan, 20 cm wide and 10 cm high
Adjustable cake ring
Small offset spatula
Acetate strip, 70 cm long & at least 12 cm high
Paint brushes
Thermometer (optional)
100 g fondant (optional)
Wide duct tape
Pastry bag fitted with a smooth 3 mm tip
Pitcher
Blow drier
DAY 1
Chocolate ganache
Break the chocolate into small pieces and put them in a bowl. Bring heavy cream to a boil. Pour immediately over chocolate, making sure all the chocolate is covered. Leave it for about half a minute to a minute and then mix it until uniform. (Use a hand blender to blend it to a more uniform consistency if you got one).
Cover the surface with plastic wrap. Let the ganache cool at room temperature for a few good hours (or even overnight) until it gets to a creamy spreadable texture.
Chocolate cake
Lightly grease the baking pan with oil. Line the pan with parchment paper by cutting a circle, 20 cm in diameter for the bottom, and a rectangle to fit the sides of the pan.
Sift flour, cocoa powder, baking powder and baking soda into a bowl. Add sugar and salt. Mix until uniform. Set aside.
Preheat oven to 175º C (350º F). Whip the eggs on medium speed until you get a foamy texture. Add canola oil and vanilla extract and mix until uniform. Bring water to a boil.
Add a third of the powder mixture to the egg batter and mix until uniform. Please note (!) Once the flour is combined in the batter, do not over mix. Add half of the milk and mix again, then add another third of the powders and mix. Add the rest of the milk and mix. Finally, add the rest of the powders and mix until the batter is uniform.
Add instant coffee to the boiling water. Mix well and add carefully to the batter. Mix again until uniform. Pour the batter into the baking pan. If possible, wrap a strip of a damp towel around the baking pan to get a more uniform bake.
Bake
Put the baking pan in the oven and bake for 60-70 minutes. Stick a toothpick in a crack in the center of the cake to check if it’s ready. The toothpick should come out almost dry, with just a bit of crumbs.
Remove the pan from the oven and keep the cake at room temperature for about 10 minutes before releasing from the pan. Let the cake cool completely at room temperature and then keep in the fridge until ready to cut. (The cake can be kept in the fridge for about a week or in the freezer for about a month)


DAY 2
Cut the cake into 3 layers, each layer 3 cm high, with a large serrated knife or a saw. To get a straight clean cut, keep turning the cake and cut first from the sides then slowly advance to the center of the cake.
Spread a little bit of ganache in the center of a serving plate. Place the first cake layer on the plate. Weigh 200 g from the chocolate ganache and spread it over the cake. Flatten the surface with a spatula. Keep in the freezer for about 10 minutes until the ganache is set.
Place the second cake layer over the cake. Weigh another 200 g from the ganache and spread it on top. Keep in the fridge for another 10 minutes until the ganache is set. Place the third cake layer over the cake. Keep in the fridge until set (30-60 minutes).
Using a serrated knife, cut a big indentation on the side of the cake, as you can see in this video. Start by cutting small pieces first and little by little advance inwards. Leave a layer of cake in the bottom to serve as a base for the Jell-O. Put the cake leftovers in the mixer bowl.

Mix
Attach the paddle attachment to the mixer. Mix on low-medium speed until you get a moist kind of dough (similar to cake pops batter). If the mixture is too dry and doesn’t come together, add a small amount of chocolate spread (or whatever you find in the kitchen) and mix.
Basically, the cake leftovers already contain layers of chocolate ganache in them and that’s supposed to make the mixture come together without the addition of any spread.
With clean hands, create mountains and hills from the mixture (gently, don’t press the mixture too hard, otherwise it will come out too dense). Spread a thin layer of ganache on top of the cake. Assemble the hills on one side of the cake to create a crescent island. Create underwater hills if you like.

Make sure the ganache is spreadable (if not, soften it a little on a double boiler). Using a small offset spatula, spread the ganache over the entire cake (it creates a sort of protective layer for the cake so that it won’t absorb the liquid Jell-O when pouring it).
While spreading the ganache, try to create a texture of horizontal straight lines, especially underwater.
Keep the cake in the fridge (or even in the freezer) until the ganache is set. Fit a pastry bag with a smooth 3 mm tip and fill it with the ganache leftovers. Keep aside.
Melt white chocolate. Using a small paint brush, gently spread white chocolate against the direction of the ganache lines. This way you highlight the texture with white. Keep in the fridge until the chocolate is set.

This is where the fun begins
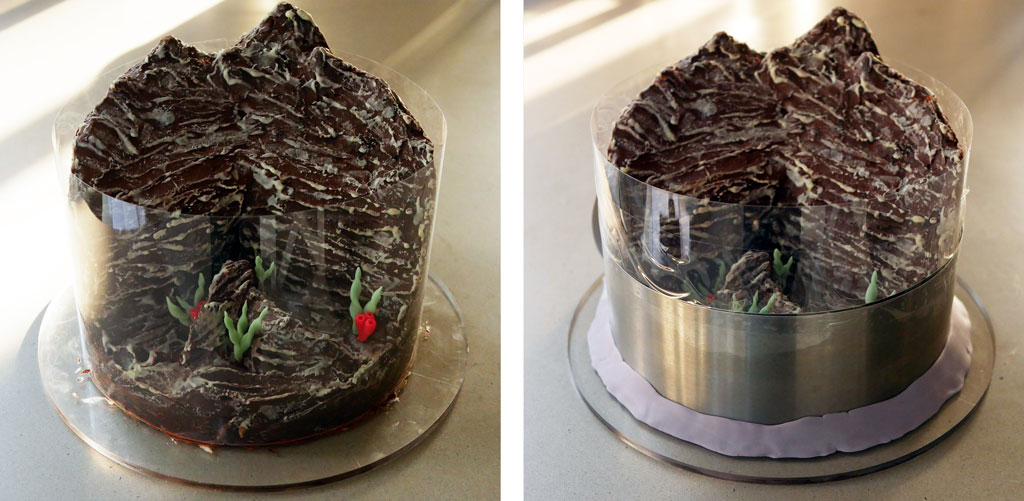
You may decorate the bottom of the sea with whatever comes to mind. I didn’t try, but I read that fondant might expand in the Jell-O and its color my seep out. So I used modeling chocolate. I created corals and seaweeds and attached them to the bottom.

Pipe a strip of ganache around the cake, about 1 cm from the bottom. Attach the acetate strip around the cake (make sure the connection line is behind the island and not on the Jell-O side). Use duct tape to tape it together. Set the adjustable cake ring around the cake and fasten it well.
Important (!) the most critical part in this island cake is to make sure it’s completely sealed so that the Jell-O won’t leak out. Some people tape the bottom of the ring to the base (all around it). I used a wide fondant strip that I attached to the bottom.
Also, I taped the ring and the acetate strip together from the outside. Finally, I piped a strip of chocolate ganache in the indentation, on the edge of the cake where it touched the acetate strip, so that the Jell-O won’t leak out of the edge.

Gelatin mass
Sprinkle gelatin powder over the water, mix well and keep in the fridge for at least half an hour. The gelatin should hydrate and absorb most or all of the water before you continue to the next step.
Jell-O
Make sure the gelatin absorbed most of the water. Cut the gelatin mass into small pieces and keep aside. Start boiling water.
Put sugar in a big bowl (I used the mixer bowl). Pour hot water into the bowl and mix to dissolve the sugar. Add gelatin mass and mix again until it melts.
Add citric acid and flavor extract to the bowl and mix. Dip a toothpick in the food coloring and then in the liquid Jell-O (just a slight touch). Mix well. It’s better to start with a lighter color and add more if needed. The color should be relatively clear. The deeper the color, the less visible the sunken part of the cake will be.
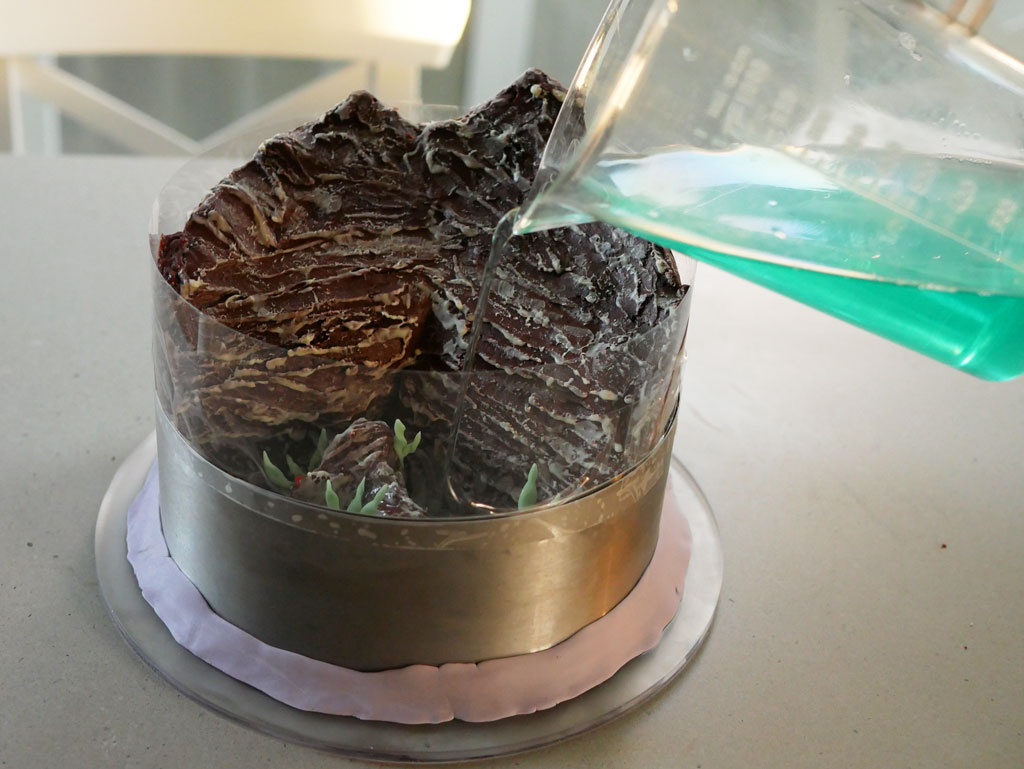
Let the Jell-O cool at room temperature. You want the temperature of the Jell-O to drop to 32 °C / 90 °F before you pour it on the cake, otherwise it might melt the ganache. Transfer the liquid Jell-O into a pitcher. Using a Spatula, remove big air bubbles if you see any.
Pour the first layer of Jell-O in the cake indentation, about 1 cm high. Keep in the fridge until it’s almost set, about 5-10 minutes. Make sure it’s still liquid though when you remove it from the fridge (if the Jell-O is completely set, you’ll get lines between the layers). Pour the rest of the Jell-O, up to the desired height. Keep in the fridge for at least 3 hours (preferably overnight).
DAY 3
The moment of truth is here. Remove the cake from the fridge. Remove the duct tape and the fondant from around the cake ring. Release the ring. Remove the piece of the tape from the connection line of the acetate strip.
Using a blow drier, warm the Jell-O side a little bit for an easier release of the acetate strip. Gently release the strip. If the Jell-O still sticks to the strip, warm it a little bit more with the blow drier.

Grind pistachio into a powder (or crush biscuits, divide in two portions and color each portion a different shade of green). Place plastic wrap over the Jell-O. Decorate the top of the mountains with green powder (dark green op top, lighter green underneath).
Spread almond powder (or uncolored crushed biscuits) in a thin strip at the bottom of the mountain alongside the Jell-O to create a tiny beach.

Using a small paint brush, paint a stripe of white food coloring along the beach (I only had white food coloring in powder so I mixed it with alcohol and used it). Using a clean paint brush, pull the white stripe towards the ocean to dilute the stripe and create a wave effect. Draw more parallel waves if you like.


Keep your island cake in the fridge in an airtight container up to a week. When you feel like travelling, remove the cake from the fridge, dip a large knife in hot water and wipe it dry. Cut a slice of a dreamy vacation. It’s best if you lest the ganache soften at room temperature (for about 10 minutes) before you take a bite.
Tags In
Related Posts
2 Comments
Leave a reply:Cancel reply

Search the blog
![]()
Get updates by email
![]()




Wow!! Stumbled upon your blog per chance. Your cakes are mad genious! Love love love all the recipes!! Hopefully I can make one of your easy-ish recipes
Thank you Yen, that’s so sweet of you 🤎
And welcome to the cake lab!