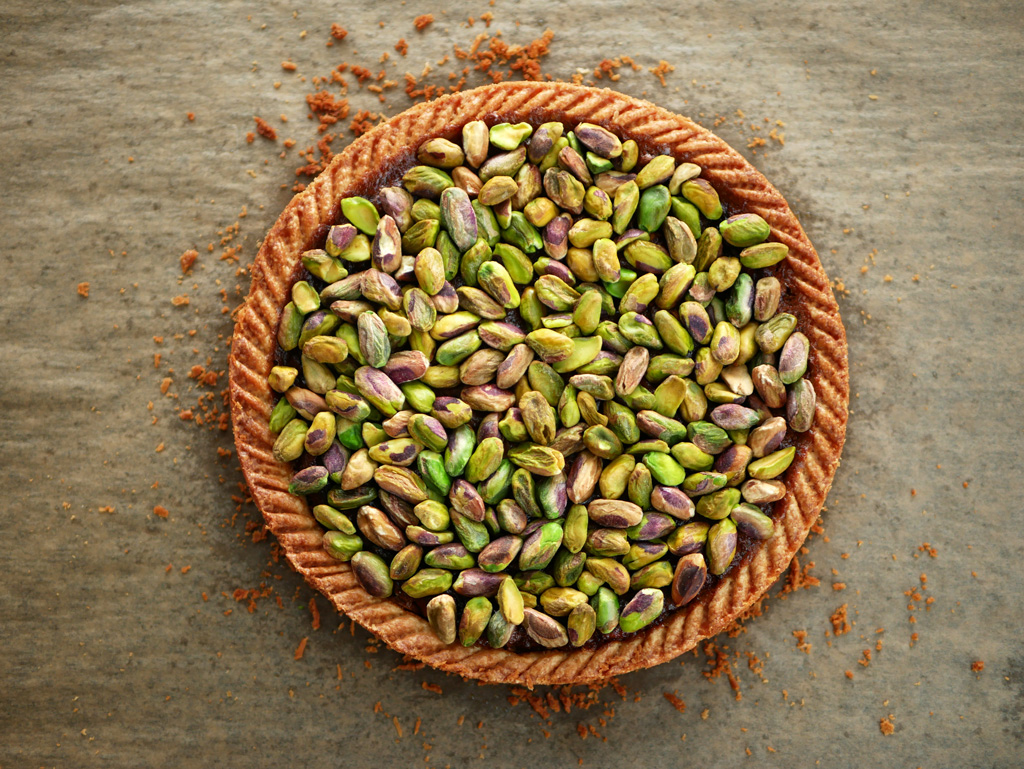
Pistachio Ginger Tart
This post was created for one reason only. I really wanted to try my hand at decorating the edge of a tart crust as seen in this YouTube video (although mute, it says a lot). In the video the chef explains how to do a perfect fonçage, which is important too, but then he continues to show how to make a nice decoration around the tart. I got excited.
Crust: Check! Now, what do I fill it with? I started looking around until I came across this next post, Pistachio Tart. But of course! I replaced the corn syrup with ginger syrup I had bought at a deli in Finland. It’s a sweet syrup with a surprising pungent taste. It goes great on pancakes. Can’t find any at your local store? You can just replace it with maple syrup. I also added ground ginger to the filling to get a stronger taste of the ginger in the nutty tart. If you want to keep the tart classically sweet, simply omit the ground ginger.


Ingredients
Crust
175 g flour
20 g almond flour
65 g powdered sugar
2 g salt (½ tsp)
Zest from 1 lemon
100 g cold butter (cut into cubes)
45 g eggs
Filling
160 g ginger/maple syrup
130 g light brown sugar
65 g butter (cut into cubes)
20 g ground ginger
150 g eggs
1 tsp vanilla paste
¼ tsp salt
60 g shelled pistachios, coarsely chopped
Coating
130 g shelled pictachios
Equipment
A round baking ring, 20 cm diameter & 2.5 cm height
Pincer
Crust
Put flour, almond flour, powdered sugar, salt, zest and butter cubes in the mixer bowl and keep in the fridge for about 10 minutes. Remove from fridge. Using the paddle attachment, start mixing at low-medium speed until the batter reaches sand-like consistency. Make sure the butter chunks are as small as possible at the end of the process without melting the butter.
Add the eggs all at once and keep mixing at medium speed until the dough starts to form but is not yet completely uniform. Remove dough parts from the bowl and combine. Cover dough with plastic wrap. Roll out the dough a little bit. Keep in the fridge for at least an hour. (It’s always better to prepare the dough in advance, the dough keeps for up to a week in the fridge and for about two-three months in the freezer.)
When the dough is stiff and cold, remove the plastic wrap. In a cool room, flour the work surface, place the dough on top and dust it with flour as well. Roll out the dough with a rolling pin. Keep turning the dough throughout and make sure it doesn’t stick to the surface. Roll out the dough to a 3-4 mm thickness.
Please note (!) If at any point the dough starts to soften, put it back in the fridge until it is stiff again.
Fonçage:
Lightly butter the inner side of the baking ring so that the dough sticks to it. Place the ring gently on top of the dough and cut a larger circle around the ring. Place the ring on a parchment paper and place the dough gently on top of it. Lift the edges of the dough, gently push the rest of the dough down and attach the edges to the sides of the ring, starting from the bottom of the ring to the top.
Gently press down on the sides so that the corners at the bottom form a right angle. (It’s not the end of the world if the dough gets torn accidentally. Just attach the sides that have been torn apart and move on).
I decorated the edge of the tart following this excellent YouTube video. I advise you to follow his guidelines too. In short, fold the dough excess back into the crust and above the baking ring to produce a flat ring of dough of about 1 cm wide.
Roll the rolling pin above the tart to get rid of the rest of the excess dough. Straighten the edge back around the top of the ring. Using a pincer, go over the edge of the tart and make a pattern as seen in the pictures. Straighten the sides of the crust from the inside. Keep in the freezer.
Filling
Preheat the oven to 175 ºC (350 ºF).
Put ginger/maple syrup and brown sugar in a saucepan. Heat on medium heat while mixing all along. Bring to a boil then remove from heat. Add butter cubes and keep mixing until all the butter has melted. Add the ground ginger and mix again. Keep aside and let it cool a little.
Put eggs in a bowl and whisk. Pour one third of the syrup mixture into the eggs while whisking all along. Pour the rest of the syrup mixture and whisk until uniform. Add vanilla and salt and mix. Add the chopped pistachios and stir lightly.
Pour the filling into the crust up to ¾ of its height. Put the tart in the oven and bake for about 40 minutes until the edge of the filling has set but the center is still a bit wobbly. The filling rises quite a lot during baking, it’s completely normal. Remove from the oven and let it rest for about 5 minutes until the filling sinks back and flattens.
Cover the filling with a layer of pistachios. Gently push the pistachios downwards so they stick to the filling. Put the tart back in the oven for about 7 more minutes to complete the baking and toast the pistachios on top. Remove from the oven and let it cool at room temperature.
To release the ring easily, go over the edge of the crust with a serrated knife and saw the edges that were baked on top of the ring. Release the ring and keep the tart in the fridge for about 3-4 days.


2 Comments
Leave a reply:

![]()
Get updates by email
![]()


ooh….i have no idea how you and Daniel stay so slim with you at home cooking these delectations on a REGULAR, if not DAILY basis!! XOOXOXXOOXOXS ? ? ? ❤️
We just invite the neighbours to eat them or bring them to work 😉