
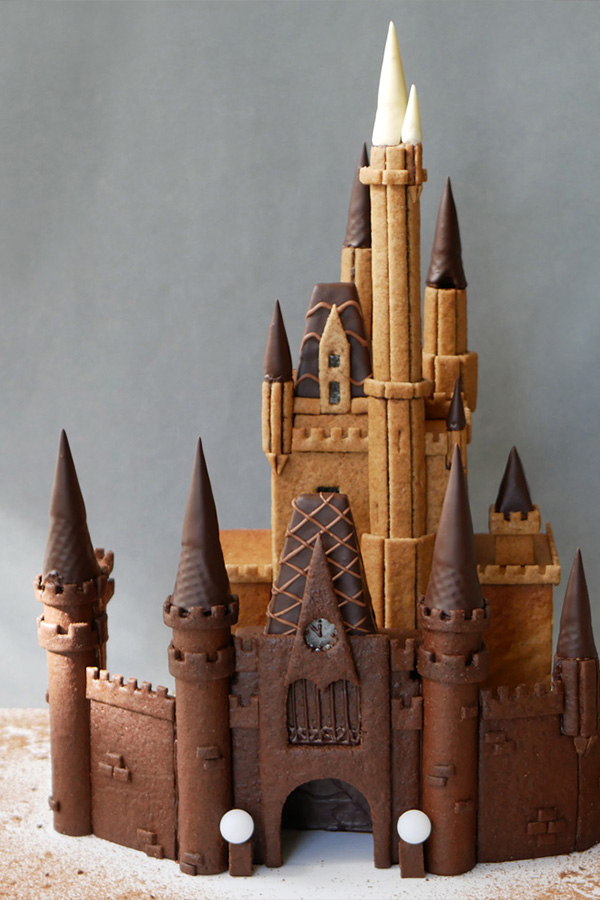
Disney Gingerbread Castle

For more than six months now, my niece, Najwa, has been dropping clues about her desired birthday gift. On Amal’s last birthday, another niece of mine, I gave her a 3D Disney castle puzzle that excited my nieces a lot and their mothers even more. So I started looking for a similar gift for Najwa’s upcoming birthday, and came across a crazy 4,080-piece LEGO Disney castle.
4,080 tiny LEGO pieces! My niece is definitely too young for that, so I didn’t want to buy it for her. But then I had a brilliant idea. I’ll buy it for myself. I opened a new tab right away and started looking for an online LEGO store. I found a store, found the castle, looked at the price and two seconds later lifted my jaw off the floor. 500$. More expensive than my PlayStation.
Ok, ok, there’s a limit to how much I’m willing to spoil myself. On the other hand, it’s a Disney castle! I do like building and assembling stuff (ask IKEA). What to do? Ah! I got it. I’ll create all the pieces myself and build an even cooler Disney castle… an edible one! I started the project with one thought in mind: if LEGO can do it, I can do it.
…
First, I had to choose which Disney castle would haunt my dreams for the next two weeks. Every Disney park has a different castle. In Florida and Tokyo, Cinderella’s castle stands tall and proud at the center. In Paris and California, you can find Sleeping Beauty’s adorable pink castle. Not so long ago, the same pink castle was also part of the Hong Kong park. Now, it’s undergoing a massive renovation that will transform it into a grandiose castle containing elements from all the Disney princesses, just like Shanghai’s “Storybook” castle, which is the largest of them all.
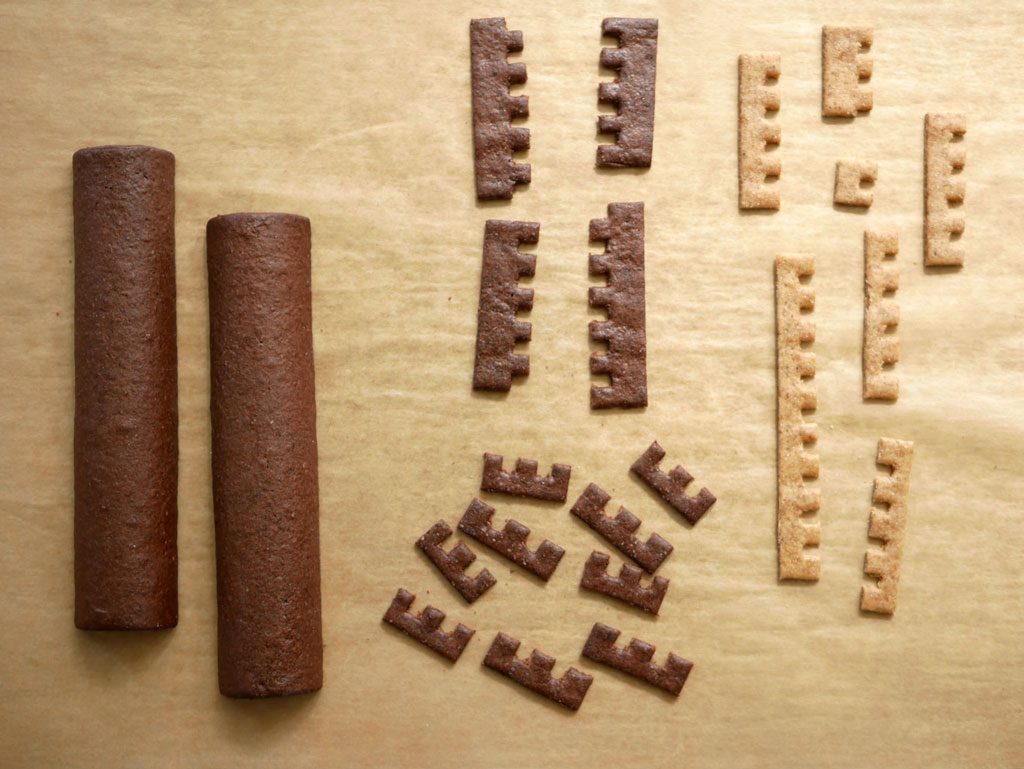
For my little project I chose the classic Cinderella castle (probably under the influence of LEGO’s model). First, I had to explore every corner of the castle. Luckily, I managed to find a 3D model of the actual castle online. I decided to dedicate most of my time to the front of the castle rather than the back, which is quite intricate. So I measured each and every part of the castle and sketched them all in Photoshop as separate parts. I printed the sketches, cut all the pieces, and voila! I created all the “LEGO” stencils I needed to build my magical castle. (You can print the stencils at the end of this post).
About 240 pieces… ok, not 4,080 pieces like LEGO’s castle, but this still is going to be a piece of work. Such a big project means one thing. I need to reassign the gift to someone who’ll appreciate the hard work. Instead of giving it to young Najwa, I’ll give it to my mom who’s celebrating her birthday a week after. Najwa will get the cheaper 3D Disney castle puzzle she’s been asking for, and everyone will live happily ever after, including me.
…
Now, on to the world of baking! I started researching edible materials to help me build the castle. In this case, gingerbread cookies are perfect. I used a recipe that makes hard gingerbread cookies that could serve as building blocks. The recipe contains a small amount of liquid and no leavening agents. This way the dough keeps its shape during baking. If you don’t want to build a sturdy castle, and just want to have soft delicious gingerbread cookies, add 1/2 tsp baking powder, 1/4 tsp baking soda, 1 tsp vanilla paste and bake only until the edges begin to brown. (Personally I like them on the crunchy side).

The recipe below is enough for a single standard baking sheet (about 30 x 40 cm). You can make as many sheets as you need for the design you desire. In order to know how many baking sheets I needed to bake, I arranged all the cutouts on baking sheets and calculated the total: 7 baking sheets for the light-colored dough and 4 baking sheets for the dark-colored dough. **

For such a big project, all the pieces must be baked in advance. So I spent a whole day just baking! After baking the pieces and then letting them cool completely at room temperature, I covered them well in plastic wrap to protect from humidity. I wouldn’t attempt this during summer, unless there’s air conditioning turned on 24/7 for this project.


…
A day after I first baked this, I discovered that humidity is truly these cookies’ enemy. All the extra cookies I left exposed overnight turned dangerously soft (keep in mind that I have to transfer this whole castle from Jerusalem to Jaffa). Being my anxious self, I had to make sure the castle wouldn’t start to soften on me during construction (which took me 2 whole days!). I decided to strengthen the main pieces of the castle by spreading melted dark chocolate on them. The chocolate hardened on the back of the gingerbread pieces. It gave them support and gave me some peace of mind. It also served as good practice for spreading chocolate on matzah (a Passover hobby of mine). In any case, I have to note that the pieces shrunk a bit at their corners due to the chocolate.

Which brings me to the next issue. The glue that’s supposed to hold everything together. I once built a gingerbread house and glued the pieces together using royal icing. It held pretty well, but took forever to dry. After a little search (what would I do without you Google), I discovered a more efficient way to glue all the pieces together… caramel! I even found this very cool blog post that explains how to make caramel sticks and use them in a glue gun to glue the pieces in the geekiest way possible.
Unfortunately, it didn’t work as smoothly as I thought it would. The caramel sticks broke inside the glue gun, probably because I was using a mini glue gun – the sticks I created were too thin and brittle. Also, the caramel set too fast and didn’t give me enough time to glue the pieces properly together. Eventually I gave up and moved to the next best thing.
Chocolate!
Chocolate saved this project twice. It strengthened the structure and also held it all together (I knew there was a good reason to choose the chocolate molecule for my blog’s logo). I melted dark chocolate, filled a pastry bag with it, cut a tiny opening at the edge and started to glue pieces together. After a while the chocolate hardened in the pastry bag. Each time this happened, I just placed the bag with the hardened chocolate near low heat until it softened back. (Be careful not to put it directly on fire or too close to it). Important Tip (!) After gluing two pieces together, go over the seam from the back side and pipe another layer of chocolate on it to strengthen the connection.


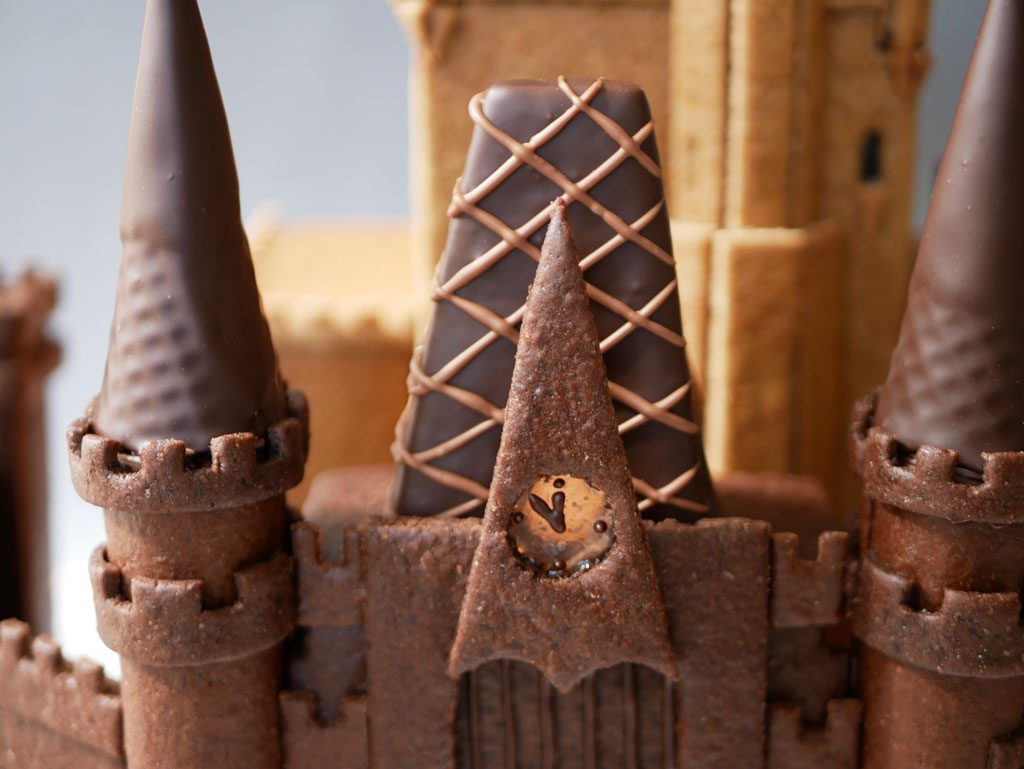
That’s not all. I have to give chocolate more credit for helping me cover the spires as well. The spires are basically made from ice cream cones that I shortened (gently) with a small serrated knife to fit the diameter of each tower. To get a pointy spire, I rolled out fondant and attached it to the pointy end of each cone. I kept it aside to let the fondant set.

…
This time around, I couldn’t just melt chocolate and use it straight away. I had to temper the chocolate to get a firm coating that wouldn’t melt easily or show any potential cocoa butter streaks. Due to the amount of cones I had to temper the chocolate a number of times. First of all, I tempered dark chocolate, poured it in a tall narrow cup and immediately dipped the five front cones sitting on the wall. I placed the chocolate covered cones on parchment paper and moved them with a spatula a little bit to get rid of the excess chocolate at the bottom (maybe I should’ve done it on a cooling rack). Then I tempered dark chocolate again. This time I covered all the rest of the rear cones sitting on the main castle (including the small gingerbread pyramid to the right).
Next, I tempered white chocolate and covered the two highest cones on the main tower. Finally, I tempered dark chocolate yet again and poured it in a wide cup this time to be able to dip the two wide gingerbread rooftops (one sitting on the wall and the second on the castle itself). After the chocolate has set on them, I laid them on their backs. I tempered milk chocolate (for the last time, woohoo!). I fit a pastry bag with a 3 mm smooth tip and filled it with the tempered milk chocolate. I piped chocolate in thin lines over the two wide spires in a pattern similar to the original castle.
…
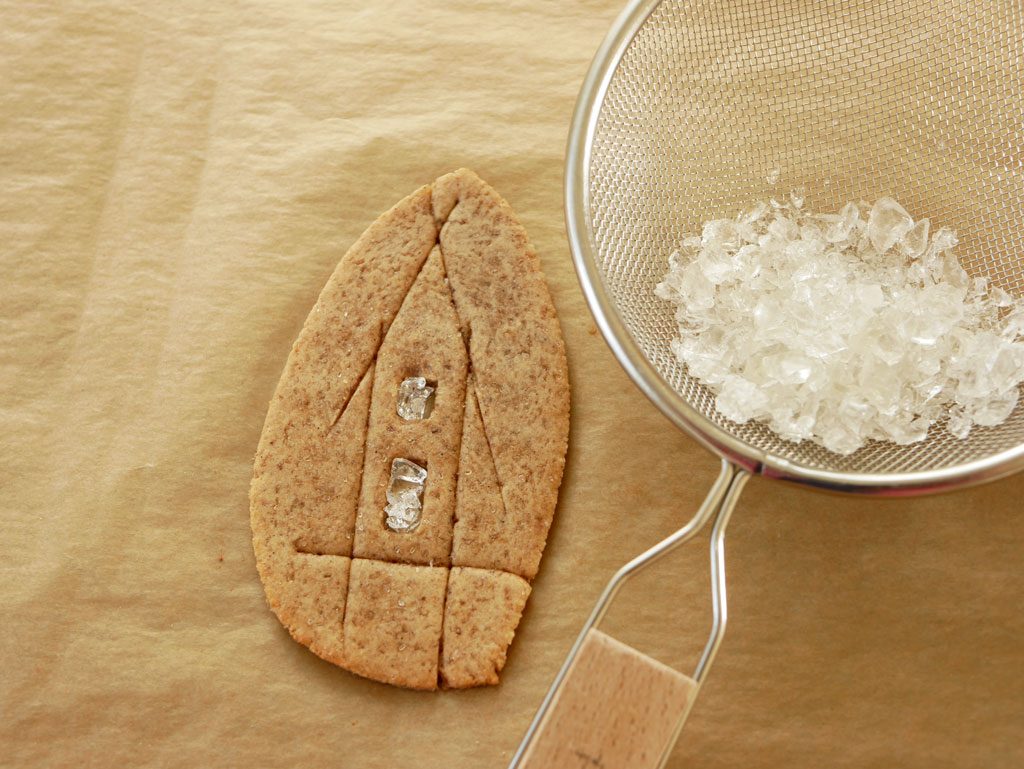
And how can I not say a word about my favorite part of this whole castle, which is the clock on the top of the gate! I created the clock and the windows using mint candy I bought at the market. I found out that it takes about 3 minutes for the candy to completely melt in the oven at 175 °C (350 °F) and still remain clear before bubbles start to appear. So I baked all the gingerbread pieces that had holes in them for 12 minutes, then took them out of the oven, filled the holes with crushed candy and put them back in the oven for another 3 minutes to complete the baking. I created the hands of the clock by piping melted chocolate on it. As befits Cinderella’s story, I set the time close to midnight.
But wait. There’s more. I wanted to add a little magic to the castle. So I placed a light bulb with an electric cord inside the castle to shed some light through the windows. I attached the base of the light bulb to some fondant to make it stand up. I also placed a string of Christmas lights between the castle and the front wall to illuminate the main castle. Then I decided to sneak two small Christmas lights from the string to the front gate to serve as external lighting. I also managed to sneak one in the wide rooftop on top of the gate to illuminate the iconic clock.

…
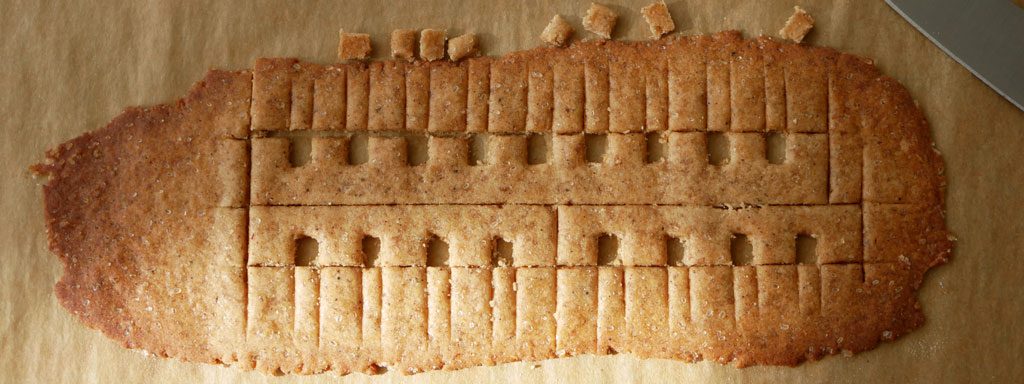
The toughest part of this project was without a doubt the four round towers on the front wall. After a few failed attempts, I decided to bake them in halves. To be able to do that, I used a narrow wooden rolling pin (about 2.5 cm) that I wrapped in aluminum foil and set on a baking sheet. (Create a little aluminum foil wedge to stick on the sides so that the pin won’t roll over). I rolled out the dark dough into a lengthy strip on parchment paper and cut 2 halves of a round tower one above the other.
I got rid of the excess dough around them. Then I placed them on the rolling pin. I rolled the parchment paper underneath and around the rolling pin. I placed the baking sheet in the oven and baked them for about 12 minutes. After I removed them from the oven, I immediately held them gently in place for a few minutes to let them set and keep their rounded shape.


I did the same for the rounded strip of bricks that adorn the top of the towers. However, I had to widen the rolling pin for that just a little. I was able to do that by leaving a baked half tower on the pin which served as an extension that allowed me to bake the tower bricks on top of it.


As for the straight strip of bricks adorning the top of the castle, they had to be baked separately from the other big pieces since they require more handling time. I actually didn’t make any more dough for them. I just used the remains of the dough from the larger pieces (which I cut and kept in the fridge until needed).

Ingredients
Gingerbread Cookies
200 g flour **
1/4 tsp cloves
1½ tsp ground ginger
1½ tsp cinnamon
1/8 tsp coarse sea salt
60 g dark brown sugar
50 g cold butter (cut into cubes)
20 g eggs (1/3 large egg)
100 g honey
Glue & structural reinforcement
600-700 g dark chocolate
Windows
30 g clear mint candy
Spires
11 ice cream cones
250 g fondant
A bit of powdered sugar
Spires coating
300-400 g dark chocolate
200 g white chocolate
100 g milk chocolate
Equipment
Aluminum foil
Lots of parchment papers
Narrow rolling pin (diam. 2.5 cm)
Microplane grater
A stable serving tray (approx. 37 x 57 cm)
LED bulb with power supply
Christmas lights
* The recipe makes one sheet of construction gingerbread cookies.
** If you look carefully at the original castle, you will notice that the front wall and gate are painted in different colors. To achieve this in my model, I baked darker colored gingerbread for the front wall. I substituted 10% of the flour with cocoa powder. In other words, I used 180 g flour and 20 g cocoa powder.
Gingerbread Cookies
Put flour, cloves, ginger, cinnamon, salt, sugar and butter cubes in the mixer bowl and keep in the fridge for about 10 minutes. Remove from fridge. Using the paddle attachment, start mixing at low-medium speed until the batter reaches sand-like consistency. Make sure the butter chunks are as small as possible at the end of the process without melting the butter.
Add vanilla and eggs all at once and then add the honey. Keep mixing at medium speed until the dough starts to form but is not yet completely uniform. Remove dough parts from the bowl and combine. Lightly dust a parchment paper with flour and place the dough on top. (If you prepare a larger amount of dough, divide the dough into equal parts, about 430 g each part, cover in plastic wrap and keep in the fridge).
Lightly dust the dough with flour as well and place a second parchment paper on top of it. Using a rolling pin, roll out the dough between the two parchment papers to a 5 mm thickness. (flip the dough occasionally and roll out the other side as well so that the parchment paper won’t get wrinkled and leave creases on the dough). Keep in the freezer for about 10 minutes. Preheat the oven to 175 °C (350 °F).
…
Gently remove the top parchment paper and release the bottom one. Place the stencils on the dough. Try to maximize the area of the dough but don’t overdo it. Place the stencils one near the other to minimize the work later. Also, it’s important to leave a bit of excess dough around the pieces to prevent the dough from spreading during baking.
Cut around the stencils with a sharp knife. Remove the stencils gently, but leave the dough on the sheet. Place the baking sheet in the oven. Bake for 15 minutes. Remove from the oven and immediately go over the marked lines again with a sharp knife. Put back in the oven and keep baking for about 5-10 minutes more until browned. (baking time will be shorter for smaller pieces)
Remove from the oven again. Set it aside to cool. Cover well until the construction begins.
Some additional notes:
It is important (!) to attach the entire structure onto a sturdy serving tray using melted chocolate to prevent it from sliding.
I left the right side of the gate open to let the light shine through it.
I attached two straws together and put a skewer inside of them. Then I placed them inside the tall tower to give it support and prevent it from collapsing.
For some odd reason, the printed stencils turned out a bit smaller than the sketches. However, they all attached wonderfully to each other eventually.
Sometimes, the baked pieces turned out uneven or different in size. This is where the Microplane grater comes in handy. After the problematic pieces cooled, I gently grated them as needed.
This project required a huge amount of parchment paper. But don’t worry! It all went to the recycle bin at the end.
Sources:
Gingerbread castle by Christine McConnell
The most wonderful gingerbread cookies by Gingerkitten D
Construction gingerbread by Stella Parks


14 Comments
Leave a reply:
![]()
Get updates by email
![]()


Super sweet design. I’ll share pics of the version my daughter and Icreate this weekend.
Awesome! have fun 🙂
Looking to make rounded towers out of gingerbread and I found this post. I’m not clear though, on how you did the rounded towers. You say you covered the rolling pin in foil, then placed the gingerbread on the rolling pin, then rolled the parchment underneath and around the rolling pin. But the photos look like the gingerbread is placed on top of the parchment, not on the foil. Did you place the parchment over the top of the gingerbread? Hoping for a little clarification – thanks!
Hi Valerie! Sorry for the confusion. It took me a while to get it myself. It’s been a minute. I think I just placed the dough with the parchment paper on the rolling pin and then rolled the paper underneath and around the rolling pin.
Wow this looks awesome! Is the PDF with the plans meant for 8.5 by 11in paper or for another size? Also do you know how tall and wide the entire structure ends up being?
Thanks Gavin!
It’s meant for an A4 paper, so yeah, that’s pretty much it (8.3 x 11.7″). I can’t remember the dimensions so much. I do still have the cardboard model back at home, so I can measure it at the beginning of next week when I’m back home.
Love the idea! Is there a construction guide to help with putting it all together? I’m not sure where to begin!
Hey Brayleigh!
Sorry, but this post was sort of a documentation of the process. I did add all the pieces to print out and there’s a video that can give you the idea of how I went through it all, but I didn’t have time to make a construction guide :/
where did you print the templates out?
Hey mina,
Just click on the cartoon castle where it says.”print stencils” and you’ll get all the templates.
Hello,
I love this cake. I, too, love that you kept the natural color of the gingerbread,
then added chocolate to darken parts of it… Subtle yet stunning.
Thanks for all the detail on its construction; your time and energy spent
will be much appreciated when the Hollidays roll around and I make this
beauty >S<
Wow, thank you Janice!
I’m kinda waiting for the holidays to roll around too.. in the mood for another gingerbread construction 😉
Spectacularly done!! I’ll bet the chocolate on the back of the crisp cookies also helped seal out any moisture, too. Clever idea. And I love the way you kept the natural gingerbread, and just played with the color of the dough. Fabulous effect.
Thank you Nikki!
Yeah, the chocolate worked like a miracle in this construction. I don’t know what I would have done without it 😉